Size 12.55 MB
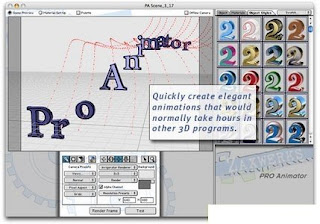
ProAnimator comes in two forms: as a standalone application and as an After Effects plug-in. Both products act exactly the same, but the plug-in is integrated into Adobe After Effects, so you can do all of your authoring with After Effects. The standalone application doesn't require a host product, so you may generate your animated movies independent of any particular target. You may even import a standalone ProAnimator scene into the ProAnimator plug-in (or vice versa) for added flexibility. ProAnimator includes all of the powerful 3D content creation tools as the 3D Invigorator PRO product. It also contains a next generation animation system that can be used to quickly generate complex animations that would take hours to create in other 3D applications.
Animation WindowIncludes an advanced animation system that you can use to generate complex animations. The work is done inside of the Animation window. The familiar track interface contains special animation segments called Poses and Transitions. You use Poses to position your objects and text. You use Transitions to tell the animation system how to move the objects from Pose to Pose. Cascading animations are a snap.
The area below the tracks contains the animation controls which are used to position objects in Poses and set animation timing in Transitions. Most of your animation can be done using just a few controls, but other controls exist so that you can create the animation you want.
Integration With After EffectsThe plug-in works well with After Effects. You can apply ProAnimator as an Effect and then bring up the ProAnimator interface with a click of a button.
You can either use After Effects 3D cameras and lights or you can use the ProAnimator camera and light controls, offering unprecedented flexibility when integrating Invigorator-style text and objects into your After Effects project.
3D Text Creation
Rather than starting in Adobe Illustrator, you can now jump into the 3D process with a full-featured text editor. The 3D text engine can use Post Script Type 1 and True Type fonts resident on your computer system to directly create 3D models using any of the 100 edge bevels included with the program.
Each letter can have its own font, size, kerning, tracking, baseline shift, horizontal and vertical scale, color, bevel, position and depth. But the most astounding hallmark to this feature is the ability to change the text at any phase of the production process and retain the color, modeling and animation.
This means that after the first version of a promo is created, 50 other versions can be created by simply changing the text. The new 3D text will retain the same coloring, text attributes, 3D beveling, texture map placement and even the animation data. This makes for an unbelievably fast production process when many changes or extra versions are needed.
3D Primitives
Need a spinning globe? Need a video box or a 3D floor? Now one button will get you there. The new primitives engine will create spheres, cubes, planes and cylinders with control over smoothness and size. There is even a control for the shading of the facets so you can create shapes that look like they have been cut from crystal or polished as smooth as a gem.
New Import/Export Format
We have added a new file format for importing and exporting 3D objects... our own! The new Invigorator object format enables you to set up 3D logos, titles and 3D text, color them, apply the materials, maps and object settings, and then save them into files which you can reuse over and over in all your other Invigorator projects. This is a huge time saver for repetitive work.
Motion Blur
Invigorator PRO version 4 now supports 3D Motion Blur. Anything that can be created or imported into the Invigorator PRO can be motion blurred. This includes models made in other programs such as Maya, 3D Studio and LightWave.
Tracking AE's 3D Camera
The plug-in version of ProAnimator has the ability to track, or mimic, what the After Effects camera and lights are doing. This feature enables you to combine AE 3D layer animation with ProAnimator animations. For instance you can set up a project containing AE layers moving in 3D, and then use ProAnimator to add dynamic moving 3D objects right over the top of the moving AE backgrounds!
Layer Map Animation
There is a new control for texture maps that will let you animate the wrap of a texture as it is applied to an object. This feature is especially useful for reflection maps. Once a 3D title comes to rest the reflections stop moving too. This can make the graphic look "dead" and uninteresting. By animating this new parameter the map will continue to move so the graphics will remain alive and visually appealing.
Highlight Mapping
Highlight Mapping, or Specular Mapping as it is sometimes called, is a type of texture mapping that only affects the highlights on an object. Much of the textural feel of a surface is contained in the highlights. The base paint job on an object may be fine, but over the top of the paint job the surface may be worn or dirty, and this type of surface detail isn't seen until you line your eye up with the glare from a light.
Creative uses of highlight mapping include hidden messages like writing on a mirror, streaks, hand prints, scratches, dents and smudges.
Render Farming
Version 4 PRO also supports render farming using the After Effects render engine. Now, multiple computers can be used to render your 3D Invigorator animations in record time.
Wireframe and Hidden Line Rendering
For the visual designer, Version 4 has many new ways to paint the final picture and broaden your options for being visually creative.
Wireframe rendering is that "techno-looking" style where 3D objects are rendered only as the lines that define their shape. This is uniquely appealing because objects look more like drawings rather than big clunky 3D objects.
Hidden line rendering is a special kind of wireframe where you only see the lines that define the visible parts of the objects. In standard wireframe you see all of the lines no matter if they are on the front or the back of the objects. But with hidden line the back lines are hidden and you only see the lines that best show the front side of the object.
Something very exciting about the way Zaxwerks has implemented line rendering is that our lines respond to lighting! This means that the lines will get brighter or darker depending on the placement and intensity of the lights. This gives shading and increased appeal to the lines rather than having plain solid-colored lines. Another unique ability is that the lines can be texture mapped! This lets you apply any of the standard maps (color, reflections, bump, etc.) to the surface of the lines. Want to make the lines look like brushed metal? Now you can.
Line weight can be set in tenth/pixel increments, are professionally anti-aliased, and even the space between the lines can be filled with a color if desired.
Cartoon Coloring
This one is really fun. It renders the 3D objects as though they were drawn by a poster artist or an animator painting animation cells. Standard 3D rendering paints the objects in continuous tones creating a photo-real look, but Cartoon Color rendering paints the objects in bands of color . The bands block in the color of the highlights, shadows and base, giving you a big bold look with lots of punch!
Absolute Coloring
This kind of rendering is useful when you want a color to be absolutely the same after rendering as it was before. For instance if you are doing a job for a corporate client who demands that their corporate colors be used and that the colors cannot be affected by the lighting or shadows in the 3D scene. This rendering option is also useful to put colored strokes around objects, for doing extremely graphic Pop Art looks, or to make 3D TV screens where the images in the TVs look as though they are lit from within.
Best of all, these new material styles can be mixed and matched within the same 3D scene. For instance you can have a wireframe sphere, casting wireframe shadows, revolving around a cartoon logo with a shadow catcher floor making the 3D scene merge into your 2D background footage! Wow!
There are also two other material styles which are useful when compositing the 3D imagery with other video or background footage.
Matte Coloring
This is a special material option that makes a 3D object act like a mask. When an object with this material is visible it creates a traveling matte. (Prints black in the alpha channel.) This is used to block out objects that you don't want to appear in the final rendering. For instance you can use a placeholder cylinder to create a "3D Mask" that to enable 3D stars to circle around an picture of a bottle.
It is also useful for creating transition effects out of 3D objects. For instance, start with a 3D star. Color the star gold. Then apply the Matte Color material to the back face of the star. Now create an animation where the star flies to the center of the screen, flips over and then flies straight at the camera. When the star flips over it reveals the back side that has been given the Matte Color material. This will create a "hole" in the 3D image which will reveal a background layer behind the 3D layer. As the star flies toward the camera the hole gets bigger and bigger revealing more and more of the background image. Once the star has covered the camera the transition is complete.
Shadow Catcher Rendering
You are going to love this one! This enables the shadows from your 3D objects to fall onto the objects in a piece of background video. The way you do this is to build 3D objects that mimic the shape of the objects in the background footage then give those objects the Shadow Catcher material.
For instance say you have a video of a package sitting on a table, and you want to animate a title that flies in and lands on the table next to the package. To make it look more realistic you want the shadow of the title to fall onto the package and the table top. Normally this is an impossible problem. The shadow will have to bend to take into account the height of the package and how it is positioned on the table, but the 3D Invigorator PRO makes it possible.
To create this effect, all you have to do is to use the new primitives modeler to create a box and a plane that will act as place holders. Adjust the box and plane to match the size of the package and the table top, and then position them in register with the background image of the real package and table. The last step is to give these placeholder objects the Shadow Catcher material. Now when you render the animation, the shadows from the title will fall onto the placeholder objects which will "catch" their shadows. The place holders themselves won't be seen. Only the shadows that fall onto them will be seen. When composited with the background video, the shadows of the 3D objects will look as though they are falling onto the package and table in the video, merging the two images into one very realistic image!
New Swatch Handling
Version 4.0 has made significant changes to the way swatches are handled. Swatches are now based on a global library system which keeps the file size down and speeds up the save process. It also means that once a material or object style is saved it is immediately available to use in all other Invigorator plug-ins, which is great for keeping projects consistent and speeding up work.
Download Here
Zaxwerks ProAnimator
Read more...